


Templates
Tools
Learn
Company
Home
Blog
Tutorials
How to Easily Make College-Style Apparel Designs | Design Tutorial
How to Easily Make College-Style Apparel Designs | Design Tutorial
College-style apparel has an iconic look. You can instantly recognize this design wherever you go, which makes it so appealing and popular among college students.
Kittl allows you to design & print hoodies, sweatshirts and other apparel easily and hassle-free. You only need an idea and inspiration – everything else is already in the browser-based Kittl designer.
If you don’t have Kittl yet, jump to this link and sign up for free. Then, come back to this tutorial, follow the steps, and create your college apparel design in minutes instead of hours.
1. Find a College Style Font
Since college apparel is all about sports teams, we’ll start the design with text. Select the text option from the left sidebar or simply press T to add text to the graphic.
Our custom apparel will feature Colorado Raptors, so we’ll begin by typing “Colorado.” Since Kittl has a massive selection of fonts, finding one in college style won’t be hard.
While the text is selected, go to the “Text Settings” menu on the right and click on the drop-down font list. The Tricot font will be ideal for this project. It’s a blocky slab serif font designed precisely for the look we’re going after.
Once you apply the font, drag the corner of the text box to increase the text. Now, let’s change the color.
You’ll find the color options under “Text Color” in the right-side menu. Click on the black circle to open the color palette. Since we’re going with Colorado, orange seemed the right choice.

2. Apply Text Effects
The base text is set, but now’s the time to make it less flat-looking – in more ways than one.
First, go to the “Text Effects” tab in the right-side menu. You’ll see two categories: “Shading” and “Decoration.” Under “Shading,” choose the third option from the left – Block Shadow. The shadow will appear as soon as you click the button, but it will need some tweaking.
First, we’ll change the shadow color to yellow. Then, we’ll give it a bit more outline width.
Go back to the “Text Settings” tab and increase the border weight of the text itself. Click the circle next to the Border Weight slider to choose a different color. We went with a cream-white shade.
The next effect we want will be in the “Text Settings” menu and under “Transformation.” These options change the shape of your text, as you can see from their names and visual examples on the buttons. Choose the “Arch” effect and tweak how strong you want it to be using the “Arch Curve” slider.

If you need to start over with a transformation effect, hit the “Reset Transform” button at the bottom of the menu. This will revert the effect to default settings.
3. Give the Letters a Finishing Touch
To get that college feel for your custom apparel, you want to make the first and last letter of “Colorado” bigger than the rest.
Double-click on the text, select the letter “C,” and cut it. Then, select the rest of the text and paste the letter on top of it. With the “C” selected, go to the “Text Settings” menu and hit the button to align left. The “C” will go to the left side following the curvature of the text. Now you can increase the “C” and, if needed, drag it up a bit to align the letter with the rest of the text.
Repeat the same process for the “O.” Of course, you’ll go with the right text alignment this time. Finally, tweak the border width of the increased letters since the border will also become bigger.

4. Create Text Framing for the Badge
Start the badge section by creating a text frame. To create more text in the same style easily, copy and paste the “olorad” part.
Remove all effects from the new text and change its color to a creamy white. Double-click the text and change it to “ESTD,” with a line break (hit “Enter”) between S and T. Shrink the text and drag it to the left, under the first “O” in “Colorado.”
Now, duplicate “ESTD,” change it to “1987” with the same line break, and drag that under “D.”

5. Insert the Badge Logo
With the text framing set, go to “Add Elements” in the left and find the “Badges” catalog. We went with the second badge on the list for the design.
Change the badge color to orange and its border to yellow to match it with the text.
Go back to the “Add Elements” menu and search for “wreath.” Create a wreath you like, center it on top of the badge, and put it in the background. Do this by right-clicking the wreath and choosing “To Back.”
Next, search for “eagle” and place the graphic of your choice in the badge. Tweak the color of the inserted elements.
Insert text, choosing the Monogram font. Type in “CR,” and the font will turn it into a monogram. Change its color and place it on the badge, above the eagle. We wanted to fill out the space around the monogram, so we inserted some stars on both sides.
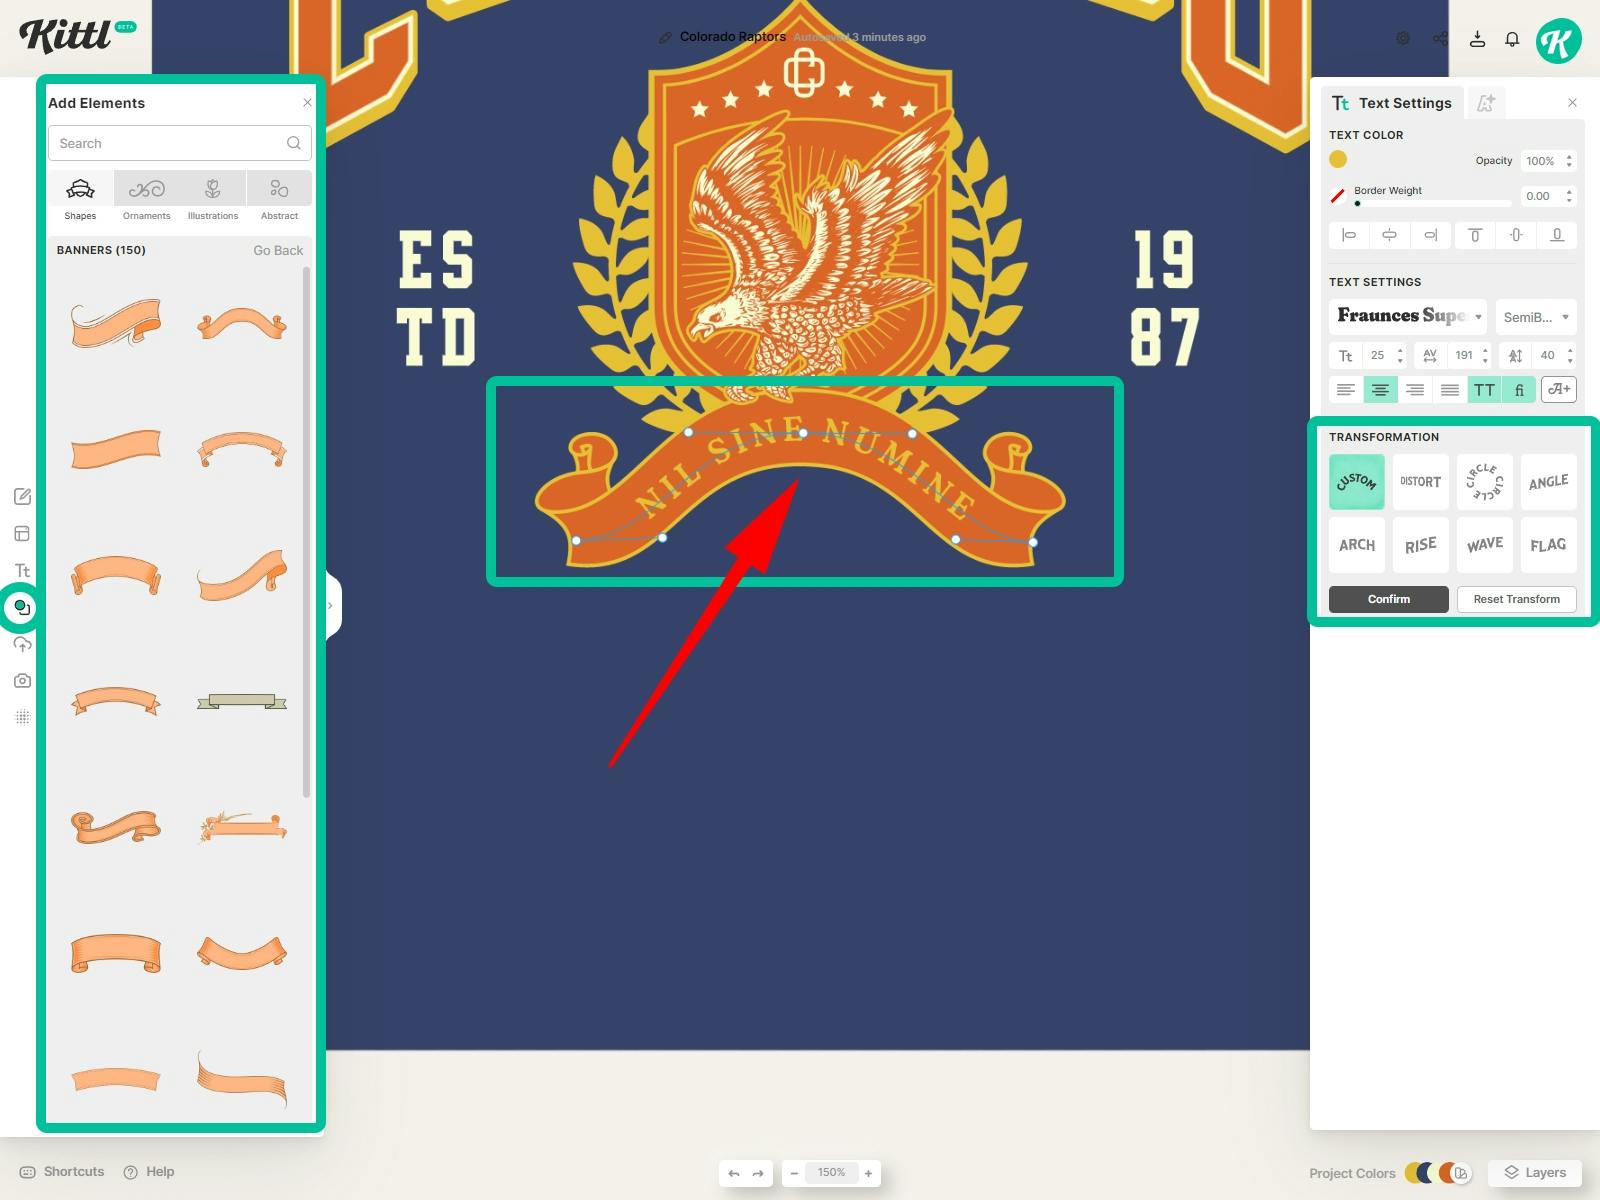
Add a banner element to the design and place it under the badge. Bring the eagle to the front and lower it to look like it’s grabbing the banner. Create text to fill in the banner – we went with “Nil Sine Numine.”
Choose the “Custom” transform option and drag the anchor points to make the text fit within the banner.
Duplicate any graphical element, including text, by holding the Op Key (Alt on Windows) and dragging the element.
6. Add Distorted Text
Let’s add “Raptors” to the design. We’ll go with the Parkwall font for this one. Drag the text below the logo, then choose “Distort” from the “Transformation” menu. Use the anchor points to drag the upper corners of the text. To make sure both sides are at the same height, turn on the grid by pressing Ctrl + apostrophe (‘) in Windows or Cmd + apostrophe (‘) on Mac.
Give the text more detail by adding a shadow and a “Color Cut” decoration effect. Of course, make the colors align with the rest of your graphic.

7. Insert the State Flag as a Vector Element
Find and download the Colorado state flag. Then, return to Kittl and upload the image using the “Uploads” option from the left menu. The image needs to be in PNG, JPG, or SVG format.
Once uploaded, choose the flag from “Uploads” and insert it into the design. Place the flag between the banner and “Raptors” text, tweak the border color, and frame it with some spot elements from the “Ornaments” section in “Add Elements.”

Your custom apparel design is ready to show school pride. You can try other great ideas to customize your college apparel and tweak the design further using the numerous tools in Kittl.

Related articles

Tutorials
DIY Cricut Heat Press T-Shirt Tutorial
How do you make an excellent t-shirt design using Kittl, Cricut, and a heat press?

Vintage
Design A Retro Lettering T-Shirt
In this video, Drew shows you how to make a retro-inspired rainbow lettering t-shirt design using Ki...

Tutorials
Create an amazing T-Shirt design
Learn how to design your own T-shirt using Kittl! Custom T-shirt designs are easier than ever with e...