


Product
Templates
Resources
Company
Home
Blog
Tutorials
How to Fit Text Into a Shape Silhouette
How to Fit Text Into a Shape Silhouette
By using Kittl's warp effects, you can easily fit text into silhouettes that are perfect for any project. We'll take you step-by-step to transform your text into a shape with a free text into shape generator. So if you're looking for an easy way to add some pizzazz to your letterings, read on to learn how to warp text into shapes below!

Step-by-Step Guide to Fitting Text into Shape Silhouettes
1. Start a New Project
Once you’re logged in, start a new project (NO problem if you don't have an account yet - you can quickly create a free account today). Choose a canvas size that fits your needs, keeping in mind the shape you’ll be working with.
2. Select the Shape Silhouette
Choose the shape you want your text to fit into. Kittl offers a wide range of pre-made shapes, or you can upload your own custom silhouette. Ensure the shape is clear and distinct to achieve the best results.
Pick a silhouette that's more simple in shape and make sure to lock the image in the layers panel.

3. Type Your Text
Begin by typing the text you want to fit into a shape. This could be anything from a single word to a longer phrase. Kittl provides a variety of fonts to choose from, so select one that complements your design.

5. Apply the Distort Effect
With your text selected, navigate to the transformation effects option. Kittl’s transformation effects are designed to mold your text into the shape of your chosen silhouette effortlessly.
Choose the Right Warp Effect: Browse through the available warp effects and select the one that best fits your design vision. Each effect will alter the text differently, so experiment to see which one looks the best.

6. Adjust and Customize
After applying the warp effect, you can adjust various settings to perfect the fit. Modify the curves, angles, and other parameters to ensure the text aligns perfectly within the shape.
Fine-Tune the Details: Make any necessary tweaks to the text size, spacing, and alignment to achieve a polished look. Kittl allows for detailed adjustments to ensure your text fits seamlessly into the silhouette.

7. Incorporate Into Your Design
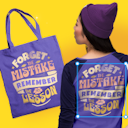
Once your text is perfectly warped into the shape, you can integrate it into your larger design. Whether it’s a design on a poster, t-shirt or packaging design the warped text will add a unique and professional touch.
For simple designs, Kittl’s background remover can help ensure your text fits cleanly into the silhouette by removing unwanted elements. If you’re looking for more creative ideas for your designs, you might find inspiration in the Flux 1 prompts or Train Flux Lora.

Tips for Using Kittl’s Warp Effects
- Keep It Simple: Start with simpler shapes if you’re new to using warp effects. As you become more comfortable, you can experiment with more complex silhouettes.
- Contrast is Key: Ensure there’s enough contrast between your text and the shape for maximum readability.
- Consistency Matters: Use consistent fonts and styles throughout your design to maintain a cohesive look.
Follow along with graphic designer, Drew, in the tutorial video below as he shows you how to warp text into shapes for free in Kittl! And you can even edit his design with the free template below!
Design with the Template in Kittl

